Do you need to pass the road test to get your WA driver's license? Try out the free version of our online course, Washington State Driving Test, and get five free lessons delivered right to your inbox.
Well, it looks like it’s time to write a post about backing around a corner. I’ve been getting a lot of questions about this one, so here goes.
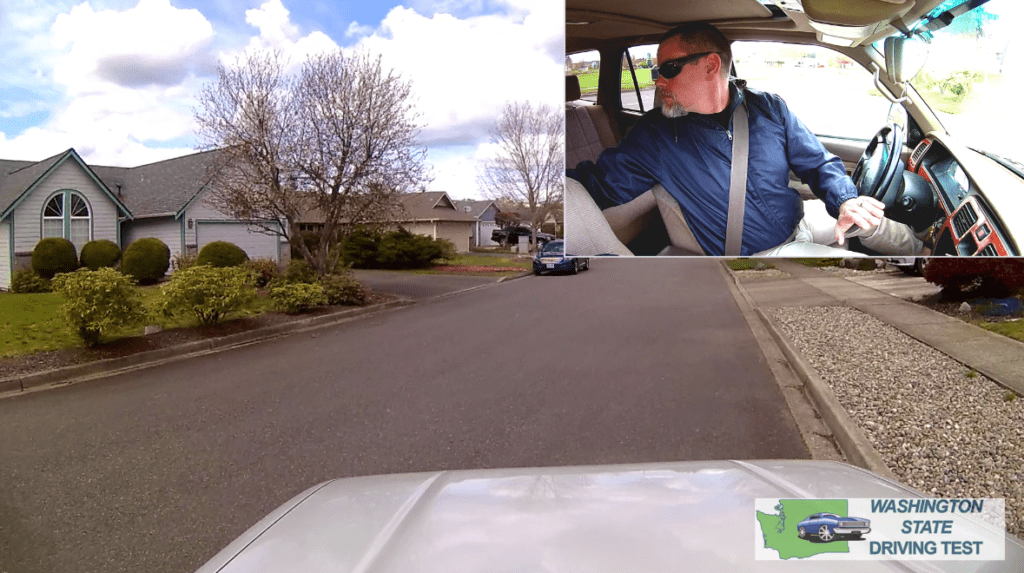
If you’re taking a driving test in Washington state, you’ll have to back around a corner
This is called the backing maneuver or just simply “backing”. The backing maneuver tests your ability to control the car and use proper vision when you’re driving in reverse. This maneuver is usually conducted on a quiet residential street or a street with low traffic.
The examiner will have you pull over to the side of the road just after an intersection. Or, they might have you turn into an alleyway and stop. Then they’ll give you instructions to back around the corner.
The most important thing to remember when backing around a corner
Whenever you drive in reverse, you need to turn around and look out the rear window. Don’t back around the corner just using your mirrors! If you don’t look out the rear window when you drive backwards, you will lose points for using poor vision.
Obviously there are some exceptions. For example if your vehicle has a camper or something obstructing the view out the rear window, they’ll let you use your mirrors. But otherwise, you need to turn around and look behind you for the entire maneuver.
When you turn around and look behind you, keep one hand on the steering wheel. Before you start going around the corner, look all around you to make sure there are no vehicles approaching. Before you reverse through a crosswalk or enter the intersection, stop and look both ways behind you for pedestrians.
Some other things to remember about backing: Stay within 18 inches of the curb After you get around the corner, you have to drive backwards in a straight line Keep looking behind you
Eventually the examiner will say “Stop”, and then “re-enter traffic.” Before you re-enter traffic, be sure to signal, check your mirror, and then look over your left shoulder to check your blind spot.
This video shows you the backing maneuver:
Washington driving test prep courses
If you already know how to drive, and want to learn exactly what you need to do on the driving test, you should check out our online test prep course, Washington State Driving Test. We offer two versions of this training, taught by a former DOL Master Examiner:
The free course gives you five video lessons in your email inbox. The free course is designed to give you a broad overview of the driving test and introduce the key concepts you should know.
The premium course is even better. It has nine video lessons that take you behind the scenes to show you the Washington driving test from an insider’s perspective. You’ll see every maneuver performed, with detailed instructions on what to do and what NOT to do on each part of the test.
KOMO News recently reported on a study by Siegfried and Jensen, which says that Washington state is the hardest state in the nation to pass the driving test. They based their evaluation on several sources of information, including information from the Washington DOL website and the Washington Driver Guide (PDF).
What the study looked at
The study included the following factors:
Learners permit requirements
License costs
Testing costs, including the knowledge and driving tests
Knowledge test difficulty and passing score required
Number of attempts to pass the test before you pay another fee
Number of graded maneuvers on the driving test
Number of graded vehicle control elements on the driving test
Number of graded elements related to traffic laws, such as signs, on the driving test
Number of graded driver behavior elements on the driving test
Number of attempts to pass the driving test before you pay another fee
Based on the descriptions on the website for the study, it appears that this study was quantitative rather than qualitative. This means that they counted numbers of things like driving maneuvers, scoring, and costs and assigned weightings to each one. The methodology doesn’t compare the relative difficulty of the material between the different states.
The bottom line is that you have to know more things, and perform more maneuvers, in Washington than in the other states.
Prepare for the hardest driving test in the US
To prepare yourself for the Washington driving test, the first thing you should do is read and understand the Washington Driver Guide (PDF). Knowing this material will enable you to pass the written knowledge test. You can also take the DOL practice test.
You also need to practice driving. Obviously, you should already know how to drive before you take your test. If you don’t know how to drive, you should take some lessons from a driving school.
Washington driving test prep courses
If you already know how to drive, and want to learn exactly what you need to do on the driving test, you should check out our online test prep course, Washington State Driving Test. We offer two versions of this training, taught by a former DOL Master Examiner:
The free course gives you five video lessons in your email inbox. The free course is designed to give you a broad overview of the driving test and introduce the key concepts you should know.
The premium course is even better. It has nine video lessons that take you behind the scenes to show you the Washington driving test from an insider’s perspective. You’ll see every maneuver performed, with detailed instructions on what to do and what NOT to do on each part of the test.
Enroll today, and get ready to pass the Washington State Driving Test!
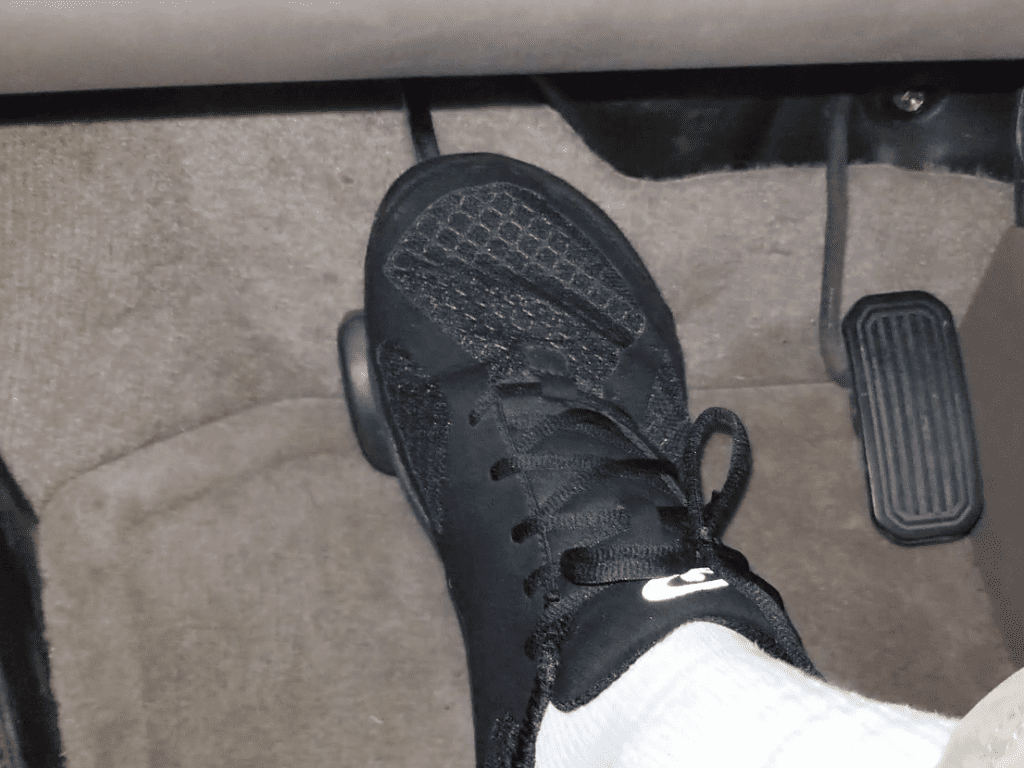
Before you start your Washington state driving test, the examiner will have you do a brake reaction test. This tests your ability to safely and quickly stop the car. This part is pretty easy to do, but it helps if you know what to expect.
How does the brake reaction test work?
For the brake reaction test, the examiner will stand outside the car. Typically, the brake reaction test is given at the end of the pre-trip inspection, where the examiner makes sure your car meets the minimum requirements in order to test in it. The examiner will stand just outside the driver’s door in a position where they can see the brake. The brake reaction test is performed with the engine turned off for safety.
You’ll have to roll down your window so that you can hear the examiner give the command.
The examiner will say:
I’m going to check your ability to stop.
Put your foot on the gas pedal. When I say stop, step on the brake as quickly as you can.
Stop!
You need to step on the brake as quickly as possible, as if you were trying to stop the vehicle in an emergency. The following video shows you what to do.
If you don’t step on the brake fast enough, the examiner will repeat the instructions and let you try the brake reaction test one more time. If you still can’t do it fast enough, then the examiner will refer you to a DOL office for testing.
When you take the Washington state driving test to get your driver’s license, you can choose which car you want to take the test in. You can bring a car to the test, or you can rent a car from the driving school where you take your test at.
The following tips will help you choose the right car to take the drive test in, so that you can avoid losing points for simple mistakes.
Take the test in a car you have driven before
Whenever possible, you should take the test in a car that you’ve driven before. This will be tremendously helpful. Taking the driving test can be stressful, and you don’t want to add to the stress by learning an unfamiliar vehicle while trying to perform the maneuvers correctly. You’ll do better on the test if you are comfortable and relaxed, and it’s a lot easier to be relaxed when you’re in a car that you are familiar with and have driven before.
There are many benefits to knowing how to control the car. During the test, you have to be able to keep the car under control at all times. When you’re driving an unfamiliar car, it is easier to make mistakes that can cost you some points on the test.
By using a car you have driven before, you will know:
Where the controls are, so that you can use the turn signals, defroster, windshield wipers, etc. without taking your eyes off the road to search for them
How touchy the brakes are, and how hard or softly you have to press the brake pedal without jerking the car or locking up the brakes
How to steer the car without oversteering or overcorrecting
How to accelerate smoothly and maintain good speed control
Where and how big are the car’s blind spots
Know the reference points of the car
It is also important to be familiar with the car’s reference points. Reference points are when you use physical parts of the car, such as the hood, headlights, etc, to help you know where the car is located in relation to other objects. This helps you be able to, for example, keep the car the required distance from the curb during the maneuvers. Reference points can be different on each car, so it is good to be familiar with the reference points of the car you use on the test.
The car should have an automatic transmission
Vehicles with an automatic transmission are much easier to drive than those with a manual transmission. The manual transmission, or “stick shift”, requires extra skill and coordination to drive well.
You don’t want to be messing around with gears and a clutch during the test. Do yourself a huge favor and use a car with an automatic transmission. Taking the drive test with a stick shift can increase your stress level, and it also gives you more opportunities to lose points and fail your test.
Good visibility is a must
You have to see and react to what is around you, and that starts with using a car with good visibility. In order to successfully perform the maneuvers, you have to be able to see where you are and what you’re doing.
Good visibility means that:
You have all your mirrors, and they are properly adjusted
Your rear window is not blocked or obstructed
You can see how far the car is from the curb or other objects
Avoid big bulky vehicles that have huge blind spots and no way to see what is behind you.
The car must be in good working order
During the pre-trip inspection, the examiner will inspect the vehicle and make sure it is safe to drive on the test. If your car has mechanical or other problems, you won’t be able to use it on the test.
Check this list to see if your car is in good working order:
No obvious mechanical problems
Brake lights work
Turn signals work
Headlights work
Tires have tread and are not bald
Parking brake can be engaged and disengaged properly
Windshield wipers and defroster work
Seat belts operate correctly
Windshield is not cracked or chipped
When in doubt, use the driving school’s car for the test
Most drive test locations in Washington state are driving schools, and most driving schools will let you use their car for the test for an additional fee.
If you take your test at the same location that you took driving lessons, then you are probably already familiar with their car. If so, then this is a good option for you.
If you haven’t driven their car before, you might be able to request a single lesson or warm-up drive before the test. This allows you to familiarize yourself with their car, and also get in some practice before the test. Prices for this service vary between locations.
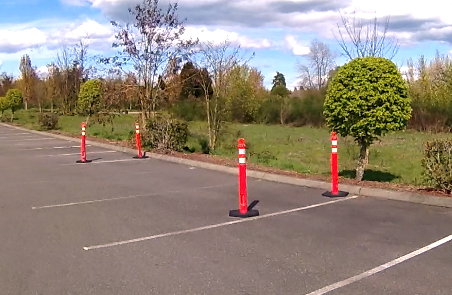
This is a typical setup for Parallel Parking using four poles in Washington State
The Washington state driving test includes parallel parking. You can parallel park on the street with real cars. Or you could park between four tall plastic poles (called stanchions) in a parking lot. You should take your test at a testing location where they parallel park between four poles instead of on the street.
Why? Because when you parallel park between four poles, it is much harder to get an automatic failure. (Learn more about automatic failures here). The two methods are scored very differently.
Hitting a car is an automatic failure, and can be costly
Whenever you hit another car, you fail your driving test instantly. You won’t even get to finish the test. The examiner will direct you back to the testing location (aka The Drive of Shame). You’ll have to try again another time, and pay for another test.
If the testing location has you parallel park on the street, you will be parking with real cars. You’ll be maneuvering very close to them, which increases the risk of hitting one. Therefore, when you parallel park between real cars, you run the risk of hitting a car and failing.
This makes the “real cars” scenario much more stressful. Because of the added risk of hitting a car, it is a high stakes maneuver. One bad move and you can fail the test and be responsible for damage you may have caused.
Hitting the four plastic poles is not an automatic failure
When you hit the plastic poles, it’s not an automatic failure. It’s only a four-point point deduction! You lose four points, and the test continues. As long as you do well on the rest of the test, hitting a pole is no big deal.
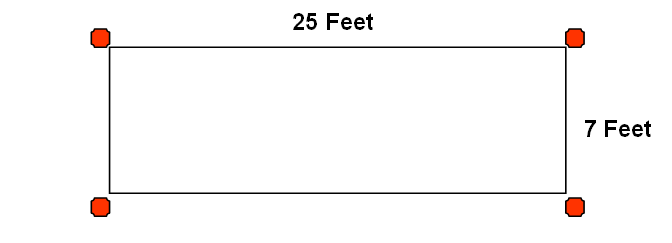
The poles are placed at fixed distances from each other. The poles should make a rectangle that is 25 feet by 7 feet.
The space created by the four poles should be 25 feet by 7 feet
The benefit of the fixed regulation distance is the fact that it makes it easier to practice. You know how big the space should be, and you can make your own practice area. You might even be able to “borrow” an existing setup at a local testing location, such as a driving school or DOL office.
Downsides to parallel parking between four poles
There are some downsides to parallel parking between four poles, though.
Without other cars to use as reference points, it is harder to accurately judge your car’s position in the space as well as the distance between the car and the cones. This increases your chances of parking too far from the curb or not being centered in the space.
It is also harder to line up properly at the beginning, before you start backing into the space, because there isn’t a car in front of the space for you to stop next to. This makes it harder to start with your car squared up to the space. This increases your chances of backing into the space at an awkward angle that is hard to correct.
It can also be difficult to see the poles behind you, which increases your chances of hitting a pole or driving too far backwards.
How to find out if a testing location uses four poles
Here are some ways you can find out whether a particular driving school or testing location uses four poles for parallel parking:
Drive by during business hours and look for poles set up in the parking lot. You’ll often see them in a far corner of the parking lot, away from traffic. You might also find them behind the building.
Talk to other people who have taken their test there, and ask them about it
Call the testing location and ask them
Learn how to pass the Washington State Driving Test
Check out our online courses that show you how to pass the Washington state driving test. We offer afree version, which sends five free lessons to your email inbox. The free version gives a nice overview of what to expect on the course.
You can also enroll in thepremium version of Washington State Driving Test. The premium version includes nine video tutorials that demonstrate exactly what to do, and what not to do, on each part of the driving test.
Changing lanes is pretty easy on the Washington state driving test, there are only a couple of things you need to remember. Whenever you change lanes, you need to do the head check procedure to check your blind spot. Here’s what you need to do:
Turn on your turn signal
Check your side mirror
Look over your shoulder to check your blind spot
When safe, move into the next lane
If you forget to look over your shoulder, or if you fail to use the turn signal, you’ll definitely lose points. It’s important to look over your shoulder before you start moving into the next lane. If you start moving into the next lane before you look over your shoulder, you can lose points for that too.
How to Change Lanes on Your Driving Test
It’s best to turn on your turn signal at the beginning of the process. This tells other drivers that you are intending to change lanes. Considerate and friendly drivers will usually see your signal, and give you room to get over. Less considerate drivers might not give you any extra room, but at least they are aware that you intend to change lanes. So the first thing you should do is turn on your turn signals.
After you turn on your turn signal, briefly check your mirror, then look over your shoulder to check your blind spot. By checking your mirror, you are watching for traffic approaching behind you. This will help you avoid cutting off other drivers. Just a brief glance is all it takes.
By looking over your shoulder to check your blind spot, you are making sure that no one is right next to you. If there is a car beside you in your blind spot, you might not see them in your mirrors. Looking over your shoulder is the only way to make sure there’s nobody there.
If it’s safe to get over after you’ve looked over your shoulder, then get on over into the other lane. Look over your shoulder just long enough to make sure it is clear.
Be Aware of What is in Front of You
When you’re looking over your shoulder, you’re not looking at what is in front of you. It’s dangerous to drive that way for any length of time. Your car is still moving forward, obviously, and the general rule is to look where the car is going.
Traffic and road conditions in front of you may change suddenly and without warning. That’s why the process of checking you blind spot must be accomplished quickly. You must maintain awareness of what is in front of you, so you don’t have a nasty surprise that turns into a failed driving test.
S.M.O.G.
This is a simple acronym to remember the procedure. Think of the word “SMOG”:
Signal
Mirror
Over the Shoulder
Go
This will help you remember the procedure for changing lanes on your driving test.
Check out our driving test prep courses
When I was teaching driving examiners how to give the Washington driving test, I learned the ins and outs of the test. Over time I realized that it could be simplified. If you follow a handful of simple rules and practices, and get lots of driving practice, passing the test is easy.
I used these simple rules and practices to create an online training course, Washington State Driving Test, to help you prepare to pass your driving test. Our premium version has nine video lessons that give you all of the tips and secrets to passing your test.
If you’re not ready for that yet, we also offer a free version. The free version has five lessons that show you the basics. As part of the five lessons, the free version also includes one of our premium lessons so that you can see what it’s like.
You have to come to a full and complete stop on your driving test. If you don’t come to a complete stop at a stop sign or red light, it’s an automatic failure.
In a complete stop, there is zero movement. In other words, the car is completely at rest. It’s not going forward. It’s not rolling backward. In a complete stop, the car is still.
Easier said than done!
I don’t know about you, but sometimes I get impatient. When I’m in a hurry and I’ve got some place I need to be, the last thing I want to do is break my momentum by stopping. Sometimes I catch myself rolling very slowly through a stop sign.
This kind of thing will cause you to fail your driving test. You have to completely stop. Rolling slowly through a stop sign is just as bad as running it on purpose at driving speed. Both of them are automatic failures on the driving test.
How do I know that I stopped completely?
It’s simple. In a complete stop, the scenery stops moving.
Now, obviously the scenery is not really “moving”. The houses and trees you see are fixed objects. But your car is moving, and the contrast between the movement of your car and the fixed objects that you are passing by creates your perception of motion. And the biggest clue that you are in motion is when it appears that fixed objects that don’t move look like they are moving. They look like they’re sliding across your windows and mirrors. Or, in dark conditions, you’ll notice the movement of lights and the dancing of shadows.
When all of this movement and motion and passing by stops, then you know that you have stopped completely. You’ll figure it out with practice, just by paying attention to when the scenery stops moving. Pay attention to your surroundings, and notice when there is no motion.
How long do I have to stop for?
There’s no set rule, its up to the examiner’s discretion. It should be brief. You want to stop long enough that you can look both ways before you go. And, if you’re turning, make sure your turn signal is on.
But if you stop too long, the examiner might think you are “hesitating” and you’ll lose a couple of points for that. If there’s someone behind you, they’ll get impatient if you wait too long. They might use their horn to let you know how they feel about it.
Just a second or two is usually long enough. Stop long enough to look both ways, make sure it is safe to go. Be sure that you wait until it’s your turn and you have the right-of-way.
Don’t try to fake it by hard tapping the brakes
Sometimes you might feel the car rock a little bit when you stop. That’s fine. You might or might not notice it. It’s not a big deal, it’s natural.
Some people deliberately hard tap the brakes to make the car rock when they are stopping. This isn’t necessary. Feeling the car rock is not as important as the complete stoppage of motion. Pay attention to the scenery.
Some people hard tap the brakes to make it “feel” like they’re stopping, without actually stopping. This is no good, it’s a fake stop! They roll through the stop sign while they jerk the car with the brakes, and they think they stopped. But the scenery kept moving, which means that they didn’t stop. They faked it, and so they failed. Don’t be a faker!
Main points
Here are the main things to remember about complete stops
If you don’t stop completely, you will fail
A complete stop is when the scenery stops moving
You only have to stop long enough to look both ways, just a second or two
Don’t fake it by hard tapping the brakes
Check out our driving test prep courses
When I was teaching driving examiners how to give the Washington driving test, I learned the ins and outs of the test. Over time I realized that it could be simplified. If you follow a handful of simple rules and practices, and get lots of driving practice, passing the test is easy.
I used these simple rules and practices to create an online training course, Washington State Driving Test, to help you prepare to pass your driving test. Our premium version has nine video lessons that give you all of the tips and secrets to passing your test.
If you’re not ready for that yet, we also offer a free version. The free version has five lessons that show you the basics. As part of the five lessons, the free version also includes one of our premium lessons so that you can see what it’s like.
Jake was sure he passed his Washington driving test. Parallel parking… Nailed it! Backing around the corner? He could have done it with his eyes closed. Jake had failed his first test, and since then he had put in a lot of time practicing. Last time he was winging it. This time he knew what he was doing. He was the king of confidence.
Imagine how surprised Jake was when the examiner told him that he had scored a 76 on his test. Another failure! Jake was confused and frustrated. How did this happen?
The examiner described the mistakes Jake had made. He had made a wide left turn on 9th street. He had also hit the curb when he pulled over to the side of the road. Jake knew about these, and he also knew that these two errors alone weren’t enough to make him fail. So why did he fail?
Then the examiner explained Jake’s vision errors to him. When he changed lanes, Jake forgot to look over his shoulder to check his blind spot. A short while later, during parallel parking, he forgot to look out the rear window when he was driving in reverse. Then he blew right through an uncontrolled intersection without looking both ways. “Uncontrolled intersection?” Jake thought. “I don’t remember that.”
When he was backing around the corner, Jake did pretty good at looking out the rear window. But after he got around the corner, and was driving backwards in a straight line, Jake stopped looking out the rear window. He used his side mirrors instead. A total of four vision errors!
Poor vision. That’s why Jake failed the test. He was not using his best possible vision. Those four vision errors, when added to his other two errors, caused Jake to lose so many points that he failed.
Don’t be Jake!
What is good vision?
Good vision means that you look where you’re going. You are aware of everything that is happening around you. You see and notice other cars, pedestrians, bicycles. It means that you see and react to intersections, road signs and signals, and changing road conditions. Using good vision and using your turn signals are crucial to passing your driving test. Vision and signal are scored in many different places on the test. If you aren’t using good vision, and you aren’t using your turn signals, you will lose points over and over again. All of this can add up to a failing score.
Good vision means that you:
Look both ways at an intersection
Look over your shoulder to check your blind spot. You’ve got to do your head checks
Turn around and look out the rear window whenever you drive backwards
When to look over your shoulder
You should look over your shoulder and check your blind spot whenever you
Change lanes or move into a turning lane
Pull over to the side of the road
Re-enter traffic, merge, or leave the side of the road
Move the car sideways
Vision and turn signals go together
If you are in a situation where you need to look over your shoulder to check your blind spot (a “head check”), then you always need to use your turn signals. If you’re doing something that requires a head-check, then don’t forget your turn signal.
When to use your turn signals
You need to use your turn signals whenever you:
Turn
Change lanes or move into a turning lane
Pull over to the side of the road
Re-enter traffic, merge, or leave the side of the road
Move the car sideways
Check out our driving test prep courses
When I was teaching driving examiners how to give the Washington driving test, I learned the ins and outs of the test. Over time I realized that it could be simplified. If you follow a handful of simple rules and practices, and get lots of driving practice, passing the test is easy.
I used these simple rules and practices to create an online training course, Washington State Driving Test, to help you prepare to pass your driving test. Our premium version has nine video lessons that give you all of the tips and tricks to passing your test.
If you’re not ready for that yet, we also offer a free version. The free version has five lessons that show you some of the basics. As part of the five lessons, the free version also includes one of our premium lessons so that you can see what it’s like.